bathroom plumbing rough-in dimensions pdf

Bathroom Plumbing Rough-In Dimensions: A Comprehensive Guide
Planning bathroom rough-in dimensions correctly during your plumbing stage prevents rework and code issues. This guide provides standard plumbing measurements,
code considerations, and troubleshooting tips for optimal placement.
Understanding the Rough-In Stage
The rough-in stage represents the initial phase of bathroom plumbing installation, occurring before walls are closed up. This critical step involves installing pipes for water supply and drainage, setting the foundation for future fixtures. Bathroom plumbing diagrams are essential during this phase, dictating the precise location of pipes for toilets, sinks, showers, and tubs.
Essentially, it’s about creating the skeletal plumbing system within the walls and floors. Accurate planning at this stage is paramount; mistakes can lead to costly rework, potential leaks, or even code violations. It’s the time to ensure proper slope for drainage, correct vent stack placement, and adherence to local plumbing codes. Careful consideration now guarantees efficient functionality and a smooth final installation.
Importance of Accurate Dimensions
Precise measurements during the rough-in stage are absolutely crucial for a successful bathroom renovation. Incorrect dimensions can render fixtures unusable, forcing costly adjustments after walls are finished. The toilet’s placement, dictated by the “rough-in” measurement, is particularly sensitive; a mismatch means the toilet won’t fit correctly.
Similarly, sink and shower valve locations require accuracy to align with intended fixture positions. Bathroom plumbing diagrams help visualize these requirements. Failing to account for finished floor heights or wall thicknesses can also lead to problems. Accurate dimensions ensure proper drainage, prevent leaks, and guarantee a passing plumbing inspection, ultimately saving time and money.
Local Plumbing Codes and Permits
Before commencing any bathroom plumbing work, verifying local plumbing codes is paramount. Regulations vary significantly by location, dictating pipe materials, fixture clearances, and venting requirements. Obtaining the necessary permits ensures your work meets safety standards and avoids potential fines or rework.
Accessing construction blueprints from the city, as submitted for permits, provides valuable insight into the original plumbing design; This information is crucial when getting bids from general contractors; Ignoring codes can lead to failed inspections and costly corrections. Always prioritize compliance to guarantee a safe and legally sound bathroom installation.
Accessing Construction Blueprints
Obtaining construction blueprints is a vital step in understanding the existing plumbing layout. Contacting your local city or county building department is the primary method for requesting copies of submitted plans. These blueprints detail the original plumbing design, including pipe locations, fixture positions, and drainage pathways.
Having these plans readily available allows for accurate assessment during the rough-in stage. It’s particularly helpful when collaborating with general contractors, enabling them to provide more precise bids. Blueprints reveal the intended plumbing configuration, minimizing guesswork and potential conflicts during installation. This proactive approach saves time and money.
Toilet Rough-In Dimensions
The toilet rough-in dimension is arguably the most critical measurement in bathroom plumbing. It defines the distance from the finished wall to the center of the toilet flange, where the toilet connects to the drainpipe. Standard rough-in sizes are 10, 12, and 14 inches, dictating toilet model compatibility.
Accurate measurement is paramount, as incorrect rough-in dimensions necessitate costly adjustments. Finished floor height also plays a role, influencing the overall toilet installation. Careful planning, considering these factors, ensures a secure and functional toilet installation. Prioritize precise measurements to avoid future plumbing headaches.
Standard Toilet Rough-In Sizes (10″, 12″, 14″)
Toilet rough-in sizes primarily fall into three categories: 10-inch, 12-inch, and 14-inch. The 12-inch rough-in is the most common, offering the widest selection of toilet models. A 10-inch rough-in is typically found in smaller bathrooms or older homes, limiting fixture choices.
Conversely, a 14-inch rough-in is often used in larger bathrooms or when greater distance from the wall is desired. Confirming the existing rough-in dimension before purchasing a toilet is crucial. Selecting a toilet that doesn’t match the rough-in requires costly pipe relocation, so careful planning is essential;
Finished Floor Height Considerations
Accurate finished floor height is vital for proper toilet and sink drain slope. This measurement, taken from the subfloor to the completed flooring, directly impacts the connection to the drain line. Incorrect height can lead to slow drainage or even backups.
Consider the thickness of all flooring materials – tile, underlayment, and subfloor – when calculating the finished floor height. Ensure the toilet flange sits slightly above the finished floor. Proper planning prevents costly adjustments post-flooring installation, guaranteeing a functional and code-compliant bathroom.
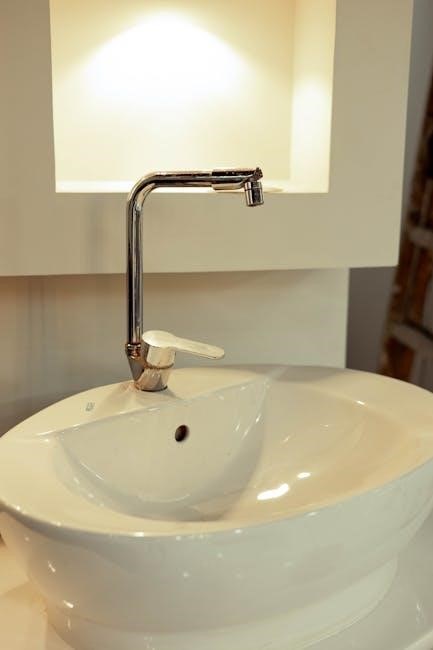
Sink Rough-In Dimensions
Precise sink rough-in dimensions are crucial for a seamless installation. These measurements dictate the placement of both the drain and water supply lines. Consider the type of sink – vanity or pedestal – as this impacts the required clearances and access points.
Typically, drain lines require a minimum of 18 inches of clearance from the finished floor. Water supply lines should be positioned approximately 8-12 inches above the finished floor. Careful planning ensures adequate space for shut-off valves and connections, preventing future maintenance headaches. Accurate measurements are key to avoiding costly rework.
Vanity Sink vs. Pedestal Sink Rough-Ins
Vanity sink rough-ins demand more space due to the cabinet. Plumbers must account for the cabinet’s depth when positioning drain and supply lines, typically allowing 21-24 inches from the wall. Access panels are vital for future repairs.
Pedestal sink rough-ins, conversely, require less space as the plumbing is exposed. Drain placement is similar, but supply lines need careful consideration to avoid being visible. Precise measurements are essential, as adjustments are difficult once the pedestal is installed. Consider the sink’s overflow drain location during planning.
Drain and Water Supply Line Placement
Drain placement requires a minimum 1.25-inch diameter pipe, sloping downwards at ¼ inch per foot for gravity flow. Locate the drain closer to the wall than the water supply. Water supply lines, typically ½-inch diameter, should be positioned above the drain, allowing 6-8 inches between them.
Ensure adequate support for horizontal pipes every 32 inches. Consider future access for repairs when positioning lines within walls. Precise alignment with fixture connections is crucial to prevent leaks. Verify local codes regarding pipe material and depth of burial within the wall or floor.
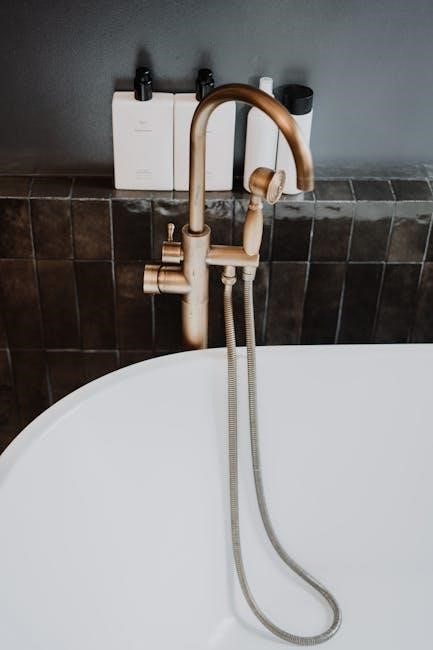
Shower and Tub Rough-In Dimensions
Shower valve height typically ranges from 67 to 72 inches from the finished floor, though this varies based on user preference. Ensure proper access for valve installation and maintenance. Tub spout height is generally 7-8 inches above the tub rim.

Plan for a dedicated water supply line for both shower and tub. Consider the tub’s overflow drain location during rough-in. Proper slope is vital for efficient drainage. Account for tile thickness when determining valve and spout placement. Verify local codes for specific requirements regarding shower pan and tub surround waterproofing.
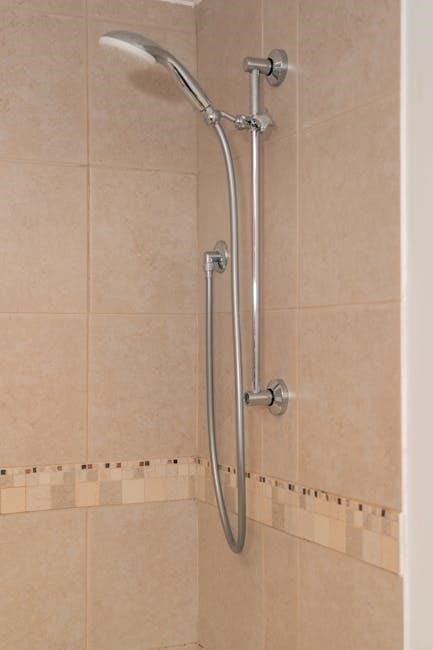
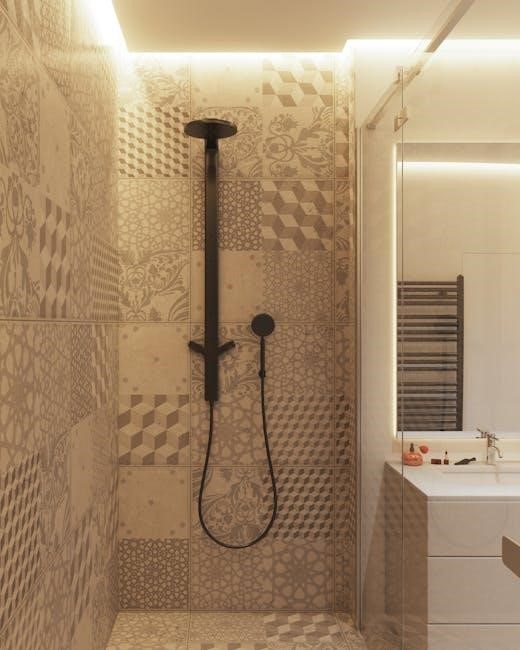
Shower Valve Height and Placement
Shower valve height is commonly set between 67 and 72 inches from the finished floor, offering comfortable reach for most users. Precise placement requires considering the showerhead type and desired spray pattern. Ensure sufficient space around the valve for handle operation and future repairs.
Access panels are crucial for valve maintenance. Consider a valve trim kit before rough-in to confirm compatibility. Proper support within the wall is essential to prevent movement. Local codes may dictate specific height restrictions. Accurate measurement and careful planning are vital for a functional and aesthetically pleasing shower.
Tub Spout Height and Placement
Tub spout height typically ranges between 70 and 76 inches from the finished floor, ensuring comfortable access for bathers. Precise placement depends on the tub’s fill height and desired water flow. Consider the spout’s reach to adequately fill the tub without excessive splashing.
Ensure the spout is centered over the tub’s long axis for balanced filling. Proper support within the wall is crucial to prevent leaks and maintain stability. Local plumbing codes may have specific requirements. Accurate measurement and careful planning are vital for a functional and enjoyable bathing experience.
Drainage, Waste, and Vent (DWV) System
The DWV system is critical for removing wastewater and preventing sewer gases from entering your home. Pipe slope is essential; a minimum ¼ inch per foot ensures gravity-driven drainage. Proper sizing of drain lines is vital to handle anticipated water flow from fixtures like toilets, sinks, and showers.
Vent stacks allow air to enter the system, preventing vacuums that can siphon water from traps. Their location and sizing are dictated by plumbing codes, based on fixture unit counts and pipe lengths. Incorrect DWV installation can lead to slow drains, gurgling sounds, and unpleasant odors.
Pipe Slope and Minimums
Maintaining correct pipe slope is paramount for efficient drainage within the DWV system. A minimum slope of ¼ inch per foot is universally recommended, ensuring gravity effectively carries wastewater away from fixtures. This prevents solids from settling and causing blockages.
Insufficient slope leads to slow drainage and potential backups, while excessive slope reduces flow velocity and can also contribute to settling. Local codes may specify stricter requirements, so always verify. Minimum pipe sizes are also crucial; they must accommodate anticipated flow rates to prevent overloading the system.
Vent Stack Location and Sizing

Proper vent stack placement is critical for maintaining atmospheric pressure within the DWV system, preventing trap siphonage and ensuring smooth drainage. Vent stacks should extend vertically through the roof, terminating at least 4 inches above the roofline. Location considerations include proximity to fixtures and avoiding obstructions.
Vent pipe sizing depends on the number and type of fixtures served. A diameter chart, based on fixture unit counts, dictates the appropriate pipe size. Incorrect sizing can lead to slow drainage or gurgling sounds. Local codes often dictate specific vent stack requirements, so adherence is essential for a compliant and functional plumbing system.
Water Supply Line Considerations
Selecting appropriate pipe materials – PEX, copper, or CPVC – is a key decision. PEX offers flexibility and cost-effectiveness, while copper provides durability and resistance to corrosion. CPVC is suitable for hot water lines. Pipe sizing directly impacts water pressure and flow rate; larger diameters deliver more water.
Water pressure must be considered when determining pipe size. Insufficient pipe diameter can restrict flow, especially with multiple fixtures operating simultaneously. Local plumbing codes specify minimum water pressure requirements. Proper planning ensures adequate water supply to all bathroom fixtures, preventing issues like low shower pressure or slow-filling toilets.
Pipe Material Options (PEX, Copper, CPVC)
PEX (cross-linked polyethylene) is a flexible, cost-effective option, easy to install with fewer connections. Copper, a traditional choice, offers durability and resistance to corrosion, but is more expensive and requires soldering. CPVC (chlorinated polyvinyl chloride) is suitable for hot and cold water, resisting high temperatures and corrosion.
PEX is ideal for running long distances and navigating tight spaces. Copper’s longevity makes it a good investment, while CPVC provides a balance of cost and performance. Consider local codes, budget, and installation expertise when selecting the best material for your bathroom’s water supply lines.
Water Pressure and Pipe Sizing
Maintaining adequate water pressure is crucial for bathroom fixture performance. Insufficient pipe sizing restricts flow, leading to low pressure, especially when multiple fixtures are used simultaneously. Generally, ½-inch pipes are standard for bathroom supply lines, but ¾-inch may be needed for longer runs or high-demand fixtures.
Water pressure typically ranges from 40 to 60 psi. Pipe sizing must account for fixture unit loads – a measure of water demand. Consult local plumbing codes for specific requirements. Proper sizing ensures efficient water delivery and prevents issues like noisy pipes or inadequate flushing.

Common Rough-In Mistakes to Avoid
Incorrect measurements are a frequent error during rough-in, leading to fixtures not fitting properly. Failing to account for finished floor heights, including tile or flooring, can misplace drain and supply lines. Ignoring local plumbing codes results in failed inspections and costly rework. Insufficient slope on drain lines causes blockages.
Poor communication between trades (plumbers, framers, tile installers) creates conflicts. Not planning for accessibility limits future usability. Overlooking vent stack placement impacts drainage efficiency. Rushing the process increases the likelihood of errors; careful planning is essential for a successful outcome.
Tools Needed for Rough-In
Essential tools for a successful bathroom plumbing rough-in include a tape measure for accurate dimensioning and a level to ensure proper pipe slope. A pipe cutter (for copper or PEX) and crimping or soldering tools are vital for joining pipes. Safety glasses and gloves are crucial for personal protection.
A stud finder helps locate framing members for secure pipe support. Marking tools like pencils and markers aid in layout. A plumbing snake can verify clear drainage pathways. Wrenches are needed for tightening fittings. Having a blueprint and laser level enhances precision and efficiency throughout the installation process.
Working with a Plumber
Consulting a professional plumber is highly recommended, especially for complex installations or if you’re unsure about local codes. They possess the expertise to ensure compliance and prevent costly errors. Getting bids from multiple general contractors is wise; compare quotes and experience levels carefully.
Remember, plumbing is roughed-in for a specific bathroom design, so changes later can be difficult and expensive. A plumber can review blueprints, identify potential issues, and offer solutions. They can also assist with obtaining necessary permits and scheduling inspections. Don’t hesitate to seek their guidance for a smooth and code-compliant project.
When to Consult a Professional
Professional consultation is crucial when dealing with significant bathroom renovations or new construction. If you lack experience interpreting construction blueprints, a plumber can decipher the plumbing diagram and ensure accurate rough-in placement. Complex layouts, moving fixtures, or altering existing drainage systems necessitate expert advice.
Furthermore, navigating local plumbing codes can be challenging. A licensed plumber understands these regulations and can prevent failed inspections. Don’t attempt DIY rough-in if you’re unfamiliar with pipe sizing, vent stack locations, or proper DWV system installation. Prioritize safety and compliance by seeking professional help.
Getting Bids from General Contractors
Obtaining multiple bids from qualified general contractors is essential for a successful bathroom renovation. Share your construction blueprints and clearly defined scope of work, emphasizing accurate plumbing rough-in dimensions. Request detailed breakdowns of labor and material costs, including PEX, copper, or CPVC piping.
Verify each contractor’s license, insurance, and references. Discuss their experience with similar projects and their understanding of local plumbing codes. A reputable contractor will offer transparent pricing and a realistic timeline. Don’t solely focus on the lowest bid; consider their expertise and communication skills for a smooth project execution.
Tank Within Wall Systems (European Style)
Tank-in-wall systems, popular in Europe, offer a sleek, modern aesthetic and space-saving benefits. If your rough-in allows, consider this option for a cleaner bathroom appearance. Careful measurement and planning are crucial, as the in-wall tank requires precise plumbing connections during the rough-in stage.
This system conceals the toilet tank within the wall cavity, leaving only the bowl and flush plate visible. It demands accurate positioning of drain lines and water supply, potentially needing adjustments to standard rough-in dimensions. Ensure the wall framing can support the tank’s weight and allows for future access for maintenance.
Planning for Accessibility
Accessibility is paramount when designing a bathroom, ensuring usability for individuals with diverse needs. ADA (Americans with Disabilities Act) compliance dictates specific plumbing rough-in requirements for accessible bathrooms. These include wider doorways, turning radii for wheelchairs, and strategically placed grab bars.

Toilet height, sink clearance, and shower entry must adhere to ADA standards. Consider a wall-mounted toilet with an appropriate height and clear floor space around it. Ensure sufficient space for maneuvering and that controls are reachable from a seated position. Planning for accessibility during the rough-in stage avoids costly renovations later.
ADA Compliance Considerations
ADA standards mandate specific plumbing rough-in dimensions for accessible bathrooms, impacting layout and fixture placement. Toilet clearances require at least 60 inches of turning space, while grab bar reinforcement within wall framing is crucial during rough-in. Sink installation necessitates knee clearance and accessible faucet operation.
Shower stalls must meet minimum size requirements and include a fold-down seat and handheld showerhead. Precise adherence to ADA guidelines ensures legal compliance and provides a safe, functional space for all users. Careful planning and accurate rough-in measurements are essential for a successful accessible bathroom design.
Troubleshooting Common Rough-In Issues
Common rough-in problems include incorrect pipe slopes leading to drainage issues, improperly sized vent stacks causing slow drains, and misaligned fixture placements requiring costly adjustments. Verify drain lines have the minimum required slope for efficient waste removal. Ensure vent stack sizing aligns with local plumbing codes to prevent siphoning.
Double-check all measurements against blueprints before securing pipes. Address any discrepancies immediately to avoid rework. If encountering unexpected framing obstructions, consult a plumbing professional for solutions. Thorough inspection and proactive problem-solving during rough-in prevent future headaches.
Resources for Bathroom Plumbing Diagrams
Numerous online resources offer detailed bathroom plumbing diagrams for rough-in purposes. City or county building departments often provide approved plumbing plans submitted during permit applications – a valuable reference. Websites specializing in plumbing and construction, like PlumbingZone and Family Handyman, feature illustrative diagrams.
Manufacturer websites for toilets, sinks, and showers frequently include detailed rough-in specifications and diagrams. Searching for “bathroom plumbing rough-in PDF” yields downloadable guides. Utilizing multiple resources ensures a comprehensive understanding of proper pipe placement and fixture installation, aiding in a successful project.
Future-Proofing Your Rough-In
Anticipate future needs during your bathroom rough-in. Consider adding extra valve locations for potential shower upgrades or body sprays. Installing a wider drain opening for the shower can accommodate future glass enclosure installations; Pre-plumbing for a separate tub filler offers flexibility.
Strategically place access panels for easy maintenance and future repairs. Utilizing universal plumbing components allows for easier fixture replacements. Thinking ahead minimizes costly renovations later. Downloadable bathroom plumbing rough-in PDFs can aid in visualizing potential upgrades, ensuring your rough-in adapts to evolving preferences.